Patience, My Friend
Use a vise to slowly press your bearings into place instead of beating them in with a hammer or you’ll end up having to epoxy the piece you cracked.
Last updated January 2019
Disclaimer
ProteShea, LLC is a participant in the Amazon Services LLC Associates Program, an affiliate advertising program designed to provide a means for sites to earn advertising fees by advertising and linking to Amazon.com
Some links may be affiliate links, in which ProteShea, LLC earns a commission if you use that affiliate link. Please note that this is at no additional cost to you and helps us in creating more content.
This is where Twin Insights were born. First, let me describe the scenario so you don’t judge me right away because I know what you’re thinking. I had just finished 3D printing a platform for a camera slider – all of the other pieces for the project were purchased and printed so this was the final piece to begin the full assembly. The bearings were used so the platform could slide along the carbon fiber tubing. Usually with bearings, they have to be press-fitted, meaning that the hole that they are going into has to be slightly bigger than the outside diameter of the bearing. To be more technical, there are guidelines to follow called Geometrical Dimensioning and Tolerancing (GD&T) which explains everything about tolerancing and why we need them.

Now, getting the tolerancing right with a 3D printer is tricky, especially since the resolution on them varies quite a bit. For example, looking at an Ultimaker S3 is anywhere between 60 – 150 microns (1 micron = 1/1,000,000 meters = 0.00004 inches), and this varies with the nozzle diameter. You also have the resolution of the stepper motors to worry about, but this is usually negligible. What I’m trying to say is that there are multiple variables that can effect your print that you don’t necessarily have control over. I think I’ve made enough excuses, let’s get back to the story.
I insert the bearing into the hole and try to press it in with my fingers – it doesn’t budge. First thing that comes to mind is “I’ll try to beat it with a hammer.” The hammer was right on the edge of the table waiting to be used. Pretty convenient right? I pick up the hammer and hit the bearing three times before I hear the material crack. I looked behind me to see if anybody else was around so I could keep the embarrassment to myself. Naturally I wasn’t alone and here comes my twin brother asking to see what happened.
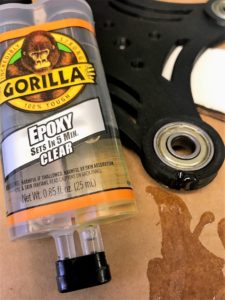
Shamefully picking up the piece, I showed him and started to describe why it wasn’t my fault – kind of what I did at the beginng of this article – but he wasn’t having it. We brainstormed how we could press in the other three bearings without the same thing happening. We walked around the workshop looking for something to use and came across the vise. I already knew what my brother was going to say as he comes back holding it in his hand. “You should have used this” he says. Exactly what I knew he would say. So, we slide the platform and the bearing between the vise and start cranking it down – worked like a charm. To fix the piece that we cracked, we used Gorilla epoxy which adheres to the filament really well. It saved us from having to print another platform and we were able to start assembling the camera slider.
What did we learn?
- Try to think about all of your options, not just going with the most convenient or quickest method.
- This could have been worse. Breaking something is never welcomed and luckily this piece was 3D printed. What if we had gotten this part sent out to get machined or we had a deadline to meet? It would have been more costly to replace and it wouldn’t have ended well.
- Double-check your tolerancing. Usually you want someone else to check because most likely, you will just glance at it.